
Showing posts with label INSTALLATIONS. Show all posts
Showing posts with label INSTALLATIONS. Show all posts
0
Anonymous
Step by Step Procedure to upgrade your computer to Windows8
Windows 8 is finally here. I just upgraded my Windows 7 desktop to Windows 8 and the process couldn’t be smoother.
All the existing software programs work just fine in Windows 8 and the built-in Windows Store offers a plethora of new full-screen “apps” to choose from. Desktop search is so much better in Windows 8, the UI feels more snappy and the system will boot faster. You don’t need to install a separate anti-virus program as Windows Defender is already included in Windows 8.
If you haven’t played with the Windows 8 beta versions earlier, it may take a day or two to get comfortable with the new layout but overall, Windows 8 is a must-have upgrade.
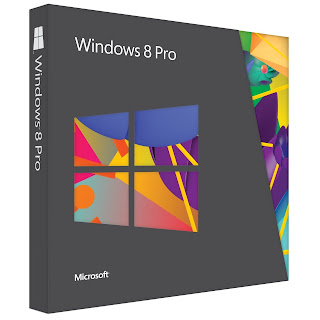


All the existing software programs work just fine in Windows 8 and the built-in Windows Store offers a plethora of new full-screen “apps” to choose from. Desktop search is so much better in Windows 8, the UI feels more snappy and the system will boot faster. You don’t need to install a separate anti-virus program as Windows Defender is already included in Windows 8.
If you haven’t played with the Windows 8 beta versions earlier, it may take a day or two to get comfortable with the new layout but overall, Windows 8 is a must-have upgrade.

Upgrading to Windows 8 – Step by Step
If you are also planning to make the switch to Windows 8 this weekend, here are 3 things you would need:
A Windows machine running Windows 7, Vista and Windows XP. It doesn’t matter if you have computer is running Windows XP Premium or Windows 7 Home Basic.
A valid credit card or a PayPal account to pay the upgrade fee – you will be required to pay $39.99 for the Windows 8 Professional edition.
An internet connection for downloading the Windows 8 installer (2.05 GB). You may also order the Windows 8 installer on a DVD though it may not be necessary as it is quite easy to create your own Windows 8 DVD.
Please note that you are opting for an “upgrade” so it will overwrite your existing copy of Windows and there’s no way you can uninstall Windows 8 to switch to the previous Windows installation.
Also, your existing software programs will only be preserved if you are moving from Windows 7 to Windows 8. If your current PC is running Windows XP or Vista, all your files and data will be preserved but you will have to reinstall the software apps after upgrading to Windows 8.
Ready? Here’s how may upgrade your computer to Windows 8.
First download and run the Upgrade Assistant program. This will essentially perform a few checks on your computer and will also suggest a list of software programs / hardware devices that may not be compatible with Windows 8.

Next you need to order your Windows 8 upgrade pack right inside the installation wizard. Choose the “Checkout” option, enter your Credit Card details and the next screen will show your Windows 8 product key that you may need at the time of installation. You don’t have to write then down on paper and Microsoft will also send a receipt of your order and the Windows serial number to your email address.
Important: What you are buying is the upgrade license that will only work on an existing Windows machine. You cannot use this Windows 8 license on a new machine that you could be building from scratch. If you wish to install Windows 8 from scratch on a new hard disk, you need the System Builder that may not be available at all locations.

The upgrade assistant will now download the Windows 8 installer files to your computer. This process may take a while since it will require the transfer of ~2 GB of data from Microsoft servers to your disk.
Tip: The Windows 8 installer files are stored in the C:\ESD\Windows\Sources folder – it’s hidden so you may not find it inside Windows Explorer.

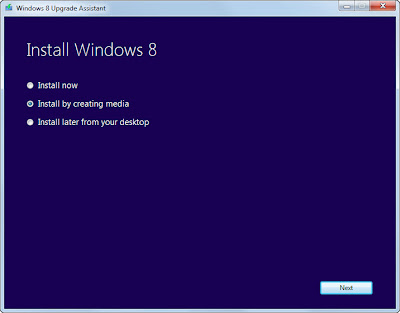
Once the installer files have been downloaded, you can continue with the installation or you may pick the second option that says – “Install by creating media.” Here you can save the Windows 8 installer files in a single ISO file and then, from the wizard itself, burn the ISO image into a bootable DVD. This may come handy later when you want to repair or reinstall Windows 8 later but have deleted the installer from the disk to free up disk space.

Once the DVD is ready, double-click the Windows Setup shortcut (you’ll find it on your desktop) to run the setup again.
You can either do a clean install and choose “Nothing” or use the “Windows settings, personal files and apps” option to preserve your files as well as programs (recommended). Also, if you choose “Nothing,” your personal files (anything saved inside the User folder and on the desktop) will be moved to a windows.old folder.
Choose the first “Install Now” option and Windows 8 will finish installing itself. Simple!
0
Ravva Vamsi
Video Tutorial Watch below this post it for clear Understanding
STEP 1: DOWNLOAD JAVA SE , There Select your platform means your OS
STEP 2:Install it as normal Software, if you have doubt watch Video tutorial given down
STEP 3:Now Go to Installation Location ,it may be insalled in C:\Program Files\java or C:\java
STEP 4:Now go to C:\java\jdk1.6.0\bin and right click on any one of the file and select properties,
there you will found like- "Location: C:\java\jdk1.6.0\bin " copy it and now go to
Computer->Properties->Advanced Settings->Environmental Variables and Create
NEW User Variable with
Variable name: path
Variable Value: your copied location and click ok
How to install Java SE Video Tutorial
How to Install Java SE on Windows with Video tutorial !!!
 |
| How to Install Java |
Hello! My Dear Users , I am Giving Now How to Install Java SE6 ( java Standard Edition )
on Windows which will run perfectly like in your collage lab, I Also GivenVideo Tutorial Watch below this post it for clear Understanding
STEP 1: DOWNLOAD JAVA SE , There Select your platform means your OS
STEP 2:Install it as normal Software, if you have doubt watch Video tutorial given down
STEP 3:Now Go to Installation Location ,it may be insalled in C:\Program Files\java or C:\java
STEP 4:Now go to C:\java\jdk1.6.0\bin and right click on any one of the file and select properties,
there you will found like- "Location: C:\java\jdk1.6.0\bin " copy it and now go to
Computer->Properties->Advanced Settings->Environmental Variables and Create
NEW User Variable with
Variable name: path
Variable Value: your copied location and click ok
How to install Java SE Video Tutorial
2
Ravva Vamsi
How to Install Turbo C++ On 64 bit Windows 7 Operating System
So Many of My Friends and Users Ask Me How to Install Turbo C++ On 64 bit Windows 7 Operating System , So I am giving Step by Step manner with screen shots to understand
better
1. Install the software DOSBox ver 0.73 : download here
2. Create a folder,for example "Turbo" (c:\Turbo\)
3. Download and extract TC into the Turbo folder (c:\Turbo\): download here
4. Run the DOSBox 0.73 from the icon located on the desktop:
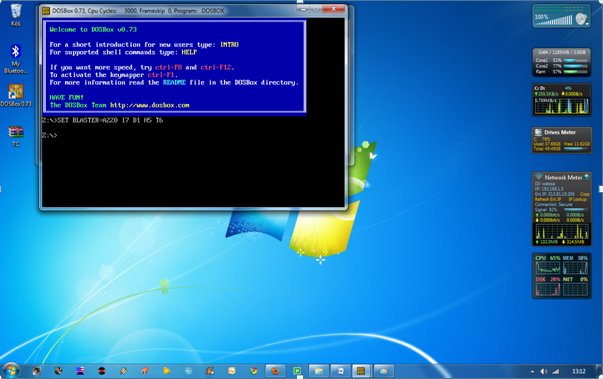
5. Type the following commands at the command prompt [Z]: mount d c:\Turbo\ [The folder TC is present inside the folder Turbo]
Now you should get a message which says: Drive D is mounted as a local directory c:\Turbo\
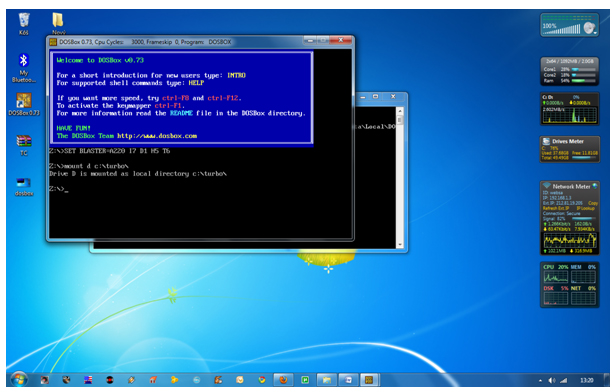
6. Type d: to shift to d:
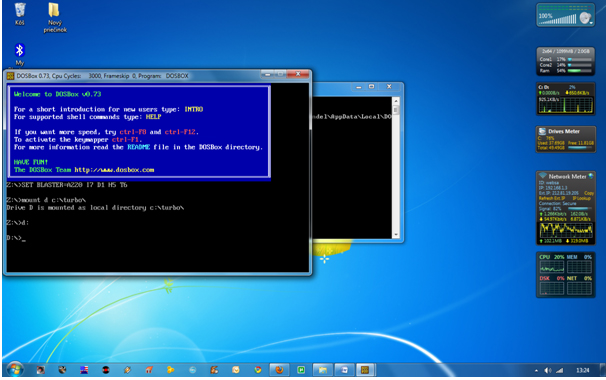
7. Next follow the commands below:
cd tc
cd bin
tc or tc.exe [This starts you the Turbo C++ 3.0]
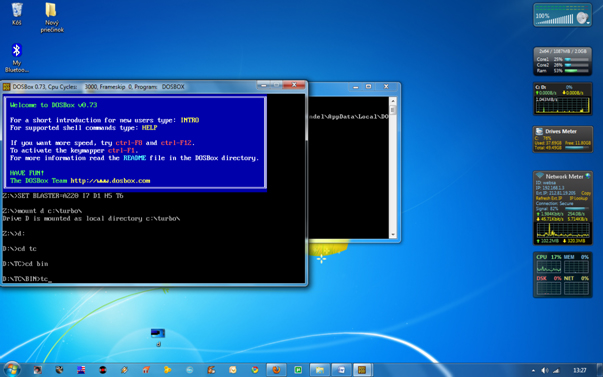
8. In the Turbo C++ goto Options>Directories> Change the source of TC to the source directory [D] ( i.e. virtual D: refers to original c:\Turbo\ . So make the path change to something like D:\TC\include and D:\TC\lib respectively )
How to start TurboC++ in the DOSBox automatically:
You can save yourself some time by having DOSBox automatically mount your folders and start TurboC++:
For DOSBox versions older then 0.73 browse into program installation folder and open the dosbox.conf file in any text editor. For version 0.73 go to Start Menu and click on “Configuration” and then “Edit Configuration“. Then scroll down to the very end, and add the lines which you want to automatically execute when DOSBox starts.
Automatically mount and start Turbo C++3.0 in DOSBox ver 0.73:
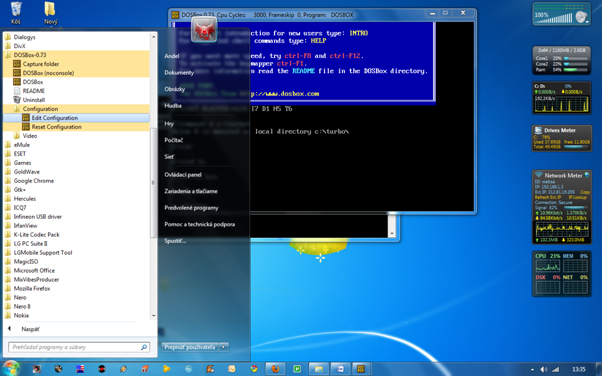
Scroll down to the very end, and add the lines:
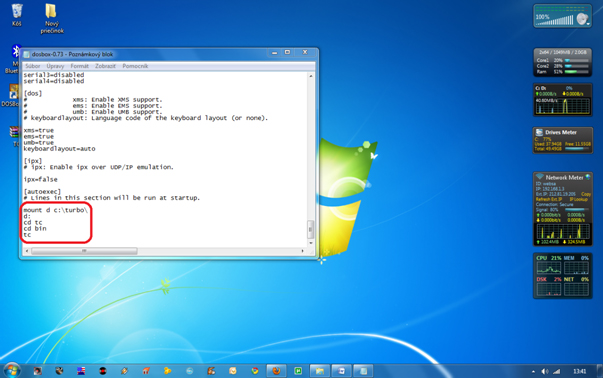
Those commands will be executed automatically when DOSBox starts!
Please note:
Full screen: Alt and Enter
When you exit from the DosBox [precisely when u unmount the virtual drive where Turbo C++ 3.0 has been mounted] all the files you have saved or made changes in Turbo C++ 3.0 will be copied into the source directory(The directory which contains TC folder)
Don’t use shortcut keys to perform operations in TC because they might be a shortcut key for DOSBOX also . Eg : Ctrl+F9 will exit DOSBOX rather running the code .
VIDEO tutorial (there is another setup – original path to Turbo C++ is h:\tc\ and drive H is mounted as drive C:)
better
1. Install the software DOSBox ver 0.73 : download here
2. Create a folder,for example "Turbo" (c:\Turbo\)
3. Download and extract TC into the Turbo folder (c:\Turbo\): download here
4. Run the DOSBox 0.73 from the icon located on the desktop:
5. Type the following commands at the command prompt [Z]: mount d c:\Turbo\ [The folder TC is present inside the folder Turbo]
Now you should get a message which says: Drive D is mounted as a local directory c:\Turbo\
6. Type d: to shift to d:
7. Next follow the commands below:
cd tc
cd bin
tc or tc.exe [This starts you the Turbo C++ 3.0]
8. In the Turbo C++ goto Options>Directories> Change the source of TC to the source directory [D] ( i.e. virtual D: refers to original c:\Turbo\ . So make the path change to something like D:\TC\include and D:\TC\lib respectively )
How to start TurboC++ in the DOSBox automatically:
You can save yourself some time by having DOSBox automatically mount your folders and start TurboC++:
For DOSBox versions older then 0.73 browse into program installation folder and open the dosbox.conf file in any text editor. For version 0.73 go to Start Menu and click on “Configuration” and then “Edit Configuration“. Then scroll down to the very end, and add the lines which you want to automatically execute when DOSBox starts.
Automatically mount and start Turbo C++3.0 in DOSBox ver 0.73:
Scroll down to the very end, and add the lines:
Those commands will be executed automatically when DOSBox starts!
Please note:
Full screen: Alt and Enter
When you exit from the DosBox [precisely when u unmount the virtual drive where Turbo C++ 3.0 has been mounted] all the files you have saved or made changes in Turbo C++ 3.0 will be copied into the source directory(The directory which contains TC folder)
Don’t use shortcut keys to perform operations in TC because they might be a shortcut key for DOSBOX also . Eg : Ctrl+F9 will exit DOSBOX rather running the code .
VIDEO tutorial (there is another setup – original path to Turbo C++ is h:\tc\ and drive H is mounted as drive C:)
1
Ravva Vamsi
How to Install Windows 7 From USB Drive
 |
| Install windows7 from usb drive |
In this tutorial I will show you how to install Windows 7 from USB drive. Before follow this tutorial, make sure you have following things:
- At least 4GB USB flash drive
- Windows 7 installation DVD
- WinToFlash software.
- Some Skills!

You got all, so continue...


Why do I use this software, because it's very easy to use and simple (no installation require). WinToFlashsoftware will help you to install windows from flash. something else need you check in your computer is your PC support boot-up from USB drive or not. you can see this option in computer BIOS. (Martik BIOS Info)


Installing windows 7 from USB drive have some advantages are you don't need to worry if the DVD drive cannot read the disc if there is any scratches on the Windows 7 installation DVD, it is more convenient to carry around your USB flash drive rather than a DVD disc, you still able to install Windows 7 although the PC doesn't even have a CD/DVD drive.
Creating Windows 7 installation USB drive
                                - There is a software called WinToFlash that does everything above automatically. All you need to do is run the program, set the location of the Windows 7 installation disc and the destination of your USB flash drive.
- Download WinToFlash software. (I recommend to use the latst version.)
- Extract download file and then go to extracted folder. run "WinToFlash.exe" then Click the “big check button” to start Windows setup transfer wizard.
- Click Next then Specify the locations of Windows 7 installation DVD and USB drive then click Next (The Windows 7 instalation DVD is the drive letter of your Windows 7 DVD drive and the USB drive is the drive letter of your USB flash drive)
- Select “I Accepted the terms of the license agreement” and click Continue.
- Click OK to start formatting your USB flash drive and the files will be automatically transferred from Windows 7 installations DVD to USB flash drive.
- Click Next when finished copying.
Testing your system for USB boot compatibility
The following tutorial will enable a user to check if a computer system can boot from a USB device and ultimately help determine if the computer can boot a Linux version from USB. In most cases if the test is successful, you should have no problem running Linux portably. In addition to testing your PC for USB Linux boot capability, the "Memtest86+" system memory diagnostics program that is included, allows the user to scan their system memory for errors by simply booting memtest from a USB device or flash drive.
Basic USB Boot Test Essentials:
- Windows PC to perform the install - USB flash device
- USB-Boot-Tester.exe (includes Memtest86+ and Syslinux)
Installing Memtest on USB to test for USB Boot compatibility: The following explains how to install Memtest on a USB device and further run Memtest from USB. Enabling us to test whether a system can boot from USB.
- Download (159 KB) and run USB Boot Tester and follow the onscreen instructions
- Reboot your computer and set your system BIOS to boot from USB-ZIP or USB-HDD. Or, set the hard disk boot priority to boot from the USB stick if your BIOS lists the device as a hard drive
- Save your BIOS settings and reboot.
Upon reboot, you should have a successful launch of Memtest from the USB flash drive:
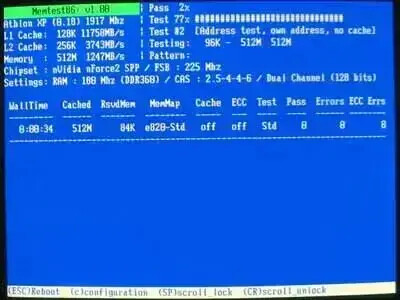
Install Windows 7 From USB Drive
This test concludes that your system is capable of booting from a USB device using Syslinux and it should be possible to run Linux from USB.
Notes: After booting Memtest from USB, it is not necessary to complete the system memory test. However, if you have the time, it can't hurt to ensure that your computers memory is in good shape.


This test does not guarantee that your computers hardware is supported with a particular Linux distribution. It is possible to pass this test and still have problems booting Linux. For example: A Video Card driver may not be available by default with a particular Linux distribution which could leave you at the shell after boot.
How to Install Windows 7 from USB drive
Boot up the computer from USB flash drive. You will need to go into BIOS setup and set to boot from flash devices (USB device). If you got it right, the Windows 7 installation should load from your USB flash drive and install the Windows 7 like installing windows 7 from DVD drive.
1
Ravva Vamsi
 Most of the Windows users are reluctant to install Linux on their system. They are afraid to risk their life! But, do we have to take such a risk to install Linux? Not anymore! Now you can install Ubuntu Linux on your Windows system just like installing a normal program, and uninstall the same way without damaging your system!


How To Install Ubuntu as any Other Windows Application
How To Install Ubuntu as any Other Windows Application
Most of the Windows users are reluctant to install Linux on their system. They are afraid to risk their life! But, do we have to take such a risk to install Linux? Not anymore! Now you can install Ubuntu Linux on your Windows system just like installing a normal program, and uninstall the same way without damaging your system!Ingredients :
Method :
- If you are installing from the CD, Put the CD into the CD ROM and the auto-run will start. If it didn’t start automatically, go to My Computer and double click on the CD (We are going to use this method).
- If you are installing from the WUBI Installer, double click on the downloaded installer file.
1) On the first screen, select : “Install inside Windows”

Wubi : Ubuntu Menu
2) Next, select the settings for Ubuntu as follows :
- Installation Drive : The drive you want to install Ubuntu (It won’t take the whole drive, it will create a small virtual drive inside it with the size you define below)
- Installation Size : The size of the virtual drive. I recommend you to select 10 GB or more (but even 5 GB is enough!)
- Desktop environment : If you don’t know anything about this select Ubuntu. If you use the CD it will only show the desktop environment in the CD.
- Language : You know your language…. so go ahead and select it!
- User Name : Any user name, as you like.
- Password : Your strong password.
After you finish everything, select “”Install”

Configurations
Now, sit back and wait! If you use the CD, it will take a lesser time, because all the files are in the CD. But if you use the installer, it will take some time for it to download the installation files from the net!
3) After they finish the installation, take the CD out , select “Reboot now” and click on “Finish”

Reboot
4) Now, when rebooting you will see a screen as shown below. In that menu, select “Ubuntu” and press enter.

Windows Boot Loader
5) After that the system will go thought the final stages of the installation and reboot, When rebooting, again select Ubuntu. Then, you’ll see a screen as follows. In that screen select “Ubuntu, Linux 2.6.31-14-generic” (the number 2.6.31-14 might vary, so don’t get scared about it!) and press enter.

GRUB Boot Loader
Now, you’ll get the login screen! Select your user name and enter the password! After that…. Enjoy!
To Uninstall Ubuntu, just go to, Start > Control Panel > Add or Remove Programs and uninstall Ubuntu from your system!
2
Ravva Vamsi
 Ubuntu is one of the most popular operating systems we have today. Actually most of the people when they got fed up with windows, try to go for Ubuntu hoping that it will change their lives. But most of the people mess up when trying to install it on their systems. Actually its easier than we think… lets see how its done….
OK then Lets start the installation…


How to install Ubuntu : The Ubuntu Installation Guide
Step by Step How to Install Ubuntu 9.10 in Your System
A perfect Explanation Given Now:-
Ubuntu is one of the most popular operating systems we have today. Actually most of the people when they got fed up with windows, try to go for Ubuntu hoping that it will change their lives. But most of the people mess up when trying to install it on their systems. Actually its easier than we think… lets see how its done….First of all what do we need?
- You must have at least 256 MB of RAM to run the alternate install CD (384MB of RAM is required to use the live CD based installer).
- Install requires at least 4 GB of disk space.
- You will also need to have an Ubuntu CD image which you can get from the Ubuntu Download page.
- After you download it burn it to a CD.
OK then Lets start the installation…
1)As the first step we need to set-up your BIOS settings. This is a bit hard to explain but easy to do. Its hard to explain because different people have different versions of BIOS in their systems. So I’ll explain it briefly :
- Login to your BIOS. To do this you have to press DEL or F1 or F2, this may differ according to your own version. When booting up it will show you what key to press, so keep your eyes open!
- Once you login, go to the section which will allow you to change the boot settings, and set CD-ROM or Removable Media as the first boot device.
- After that press F10 to save and exit.
2) Next put your Ubuntu CD into the system and boot it. Then you’ll see a screen as follows :
 Select your language |  Install Ubuntu |
- First select your language.
- And in the next screen, select “Install Ubuntu”
3) Now you’ll see the welcome screen. Select the language you want to use for the installation process and click “Forward”

Welcome Screen
4) Next you have to select your time zone. Select your region from the left drop down list and select your zone from the right drop down list. Or you can simply select your country from the map.

Select your time zone
5) After that you have to select your keyboard layout. For most of us its suggested by Ubuntu, but if thats not your layout…. you can select it from the list.

Select your key board layout
6) Next thing is the most important task so follow the instructions carefully! In the next page it will ask you what to do with the partitions :

Prepare disk space
- In here I have no partitions previously defined, so if thats the case you can continue with the layout that is suggested by ubuntu. But you also can do it manually. For people who already have other operating systems or other partitions, Im recommending to do it manually!
- So in here I have selected “Specify Partitions Manually”. After that click “Forward”

New Partition Table
8) Next we need to create the partitions. Select the free space and click on “Add” :
 Add partition |  New Partition |
- Now first you have to select what type of partition you want.
- Then give the amount of space you need to give for it.
- Next, the location for the new partition. leave it in its default settings.
- After that you have to specify the format of the partition.
- Finally you have to give the mount point.
If you don’t have any partitions, If your hard disk is new :
- Create one primary partition with about : 30% of the free space, Partition format Ext4, Mount point “/”. (if you want you can make a primary partition with the mount point “/boot” (with about 1 GB) first, if you do that do not make the root partition (partition with the mount point “/”) primary, make it logical.)
- Create one logical partition with about 5 GB space (this partition should be double the amount of your memory. If you have 1 GB of memory, make this partition 2 GB. But its not compulsory to do like that) , Partition format Swap.
- Create one logical partition with the rest of the free space, Partition format Ext4, Mount point “/home”.
If you have an operating system installed :
- First make some free space (if you don’t have any). Select an existing partition and click on “Change” and then reduce the size of that partition.
- After that create one logical partition with about : 30% of the free space, Partition format Ext4, Mount point “/”.
- Create one logical partition with about 5 GB space (this partition should be double the amount of your memory. If you have 1 GB of memory, make this partition 2 GB. But its not compulsory to do like that) , Partition format Swap.
- Create one logical partition with the rest of the free space, Partition format Ext4, Mount point “/home”.
Note : Its not compulsory to crate two partitions with mount points “/” and “/home”. You can make only the root (“/”) partition.
9) After you finish setting up the partitions click “Forward”

Finish partitioning
10) Next you have to give your details :

Set up your details
- Give your Name, User name, A strong password, and the login method.
- If you don’t want Ubuntu to prompt you for user-name and password each time you login, click on “Log in automatically”
- But if you want it to ask, select “Require my password to login”
- If you want to encrypt the home folder select “Require my password to login and decrypt my home folder”.
- After you set everything up, click on forward.
11) Now Ubnutu will show you the settings which you have specified throughout the process. Go through it (If you want). And click on “Install”. After that Ubuntu will start installing…
 Ready to install |  Installing |
12) During the installation it will start to download the language packs. Now this may take some time, so if you think you are wasting your time, you can skip it.

Installing language packs
13) When the installation is over, you’ll be asked to restart the machine. Click on “Restart Now”. Finally the system will eject the CD. Take the CD out and press enter.
 Restart Now |  Remove the disk and press enter |


Subscribe to:
Posts (Atom)


