
0
 Unfortunately, resizing your Windows Vista partition isn’t particularly easy. That fact is regardless of the presence of Vista’s drive management tool, the piece of Windows functionality that should make it easy to shrink or extend your drive partitions.


4) Disable the kernel memory dump

 Start the defragmentation process
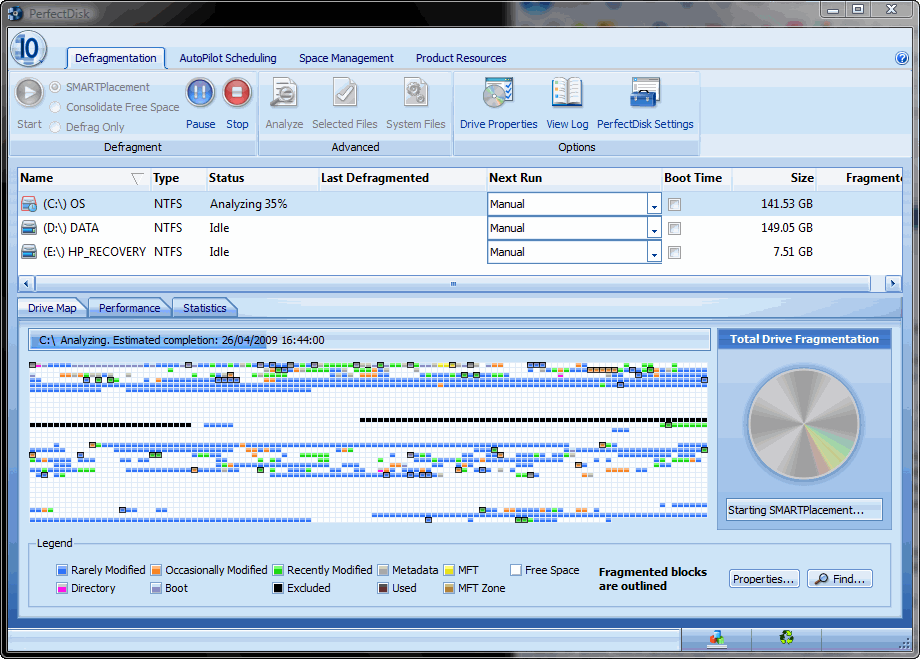


How to resize a Windows Vista partition
Resize the Windows partition
A Windows partition should be at least 20 Gb (recommended 30 Gb for Vista/Windows 7), and an Ubuntu partition at least 10 Gb (recommended 20 Gb). Obviously, if you have plenty of disk space, make the partition for whichever will be your favored operating system larger.
Windows XP
If using Windows XP (or other older Windows OS), you can use the GParted partition manager to shrink the Windows partition and thereby leave free space on the hard drive for the Ubuntu partition.
Unfortunately, resizing your Windows Vista partition isn’t particularly easy. That fact is regardless of the presence of Vista’s drive management tool, the piece of Windows functionality that should make it easy to shrink or extend your drive partitions.So, while I’ve been preparing to install Ubuntu Jaunty Jackalope I’ve had to learn how to get around this problem. I thought I’d share the process with you and add some value to this forum post by testing the process and simplifying it with screenshots and a step by step guide.
The problem with Windows Vista drive management
Does this screen look familiar? The total available shrink space on your C: drive is zero or very low:
The reason why you can’t just shrink a Windows Vista partition is largely due to the existence of files that can’t be moved through conventional means (or even standard defragmentation) such as the Master File Table, Pagefiles and Hibernation data. To actually make some free space available to the drive management tool, you’ve got to get your sleeves rolled up.
How to shrink your Windows Vista Partition
1) Disable hibernation
To disable hibernation, open up a command prompt window as administrator and key in the following command:
powercfg -h off2) Disable system restore
Right click on your My Computer icon and click properties. Click the “System Protection” tab and uncheck the drive you want to
disable hibernation for, and confirm your choice.
disable hibernation for, and confirm your choice.
3) Disable the pagefile
In the same system properties dialogue, go to the
Advanced tab and click the Performance button. Under Advanced, click “Change” and select “No Paging File”4) Disable the kernel memory dump
Once again, return to the Advanced System Settings dialogue and go to the Advanced tab and click the Settings button under “Startup and Recovery”. Under “System Failure”, change the drop-down menu to (none).
5) Clean your disk
Now, Run the disk cleanup wizard and be sure to delete all of your previous restore points and hibernation files.
7) Download and install the 30-day free trial of PerfectDisk 10 Professional
This is the software I used to complete the defragmentation process and it worked. While there are a number of other advanced partitioning tools out there, I cannot recommend any until I’ve tried them. If you have a recomendation, please leave your comments below. I downloaded the free trial for the professional version.
In the Perfectdisk interface, select your drive and run a SMARTPlacement defragmentation – click the image to enlarge. The SMARTplacement defrag option is the radio button in the top left hand corner. Click “Start” to get going – the whole process could take a while so be prepared to wait an hour or so.
9) Nearly finished
Finally, do a consolidate free space defrag. This will further maximise your available free space and completes the process.
When all of this is complete you’ll see results that look a little similar to this:
10) Shrink your volume
You should be ready to shrink your system volume, so, click “manage” with a right mouse button click on the My Computer icon:
11) Manage your disk
In the Computer Management Dialogue, double click “Disk Management” and right mouse click on your C: drive to begin the volume shrinking process. When you’re done, you’ll see a new, unallocated space like this:
That’s it! Remember to return the settings you changed earlier on in the process back to their original values, and if you’re not sure about carrying out any of the instructions in this post you’d be well advised to back up a copy of your hard drive first.
Subscribe to:
Post Comments (Atom)


0 Responses to “How to resize a Windows Vista partition”
Post a Comment
Add your valuable comment here, ask any questions about this post,
Share your opinions here.
Dont write any Phone numbers in comment...